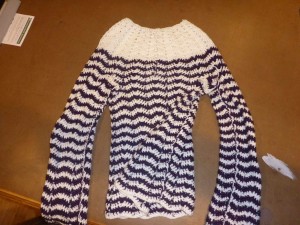
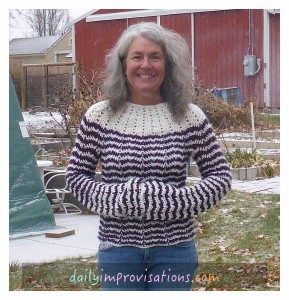
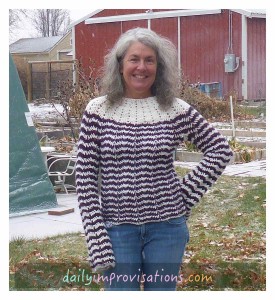
This crocheted sweater, based very closely on this pattern from Esther at makemydaycreative.com, was a reasonable challenge for my third attempt at a sweater for me to wear. In spite of not quite understanding the sizing instructions when I started, not recognizing how loose the stitches were in the photo (somewhat disguised by the white camisole underneath), and not expecting it to be quite so thick, I am pleased with it overall.
 I did try to read the pattern instructions thoroughly before I began, but I misunderstood something she wrote about which size she made. I got the wrong impression that the size she made was the first numbers given. It was not. Not her fault.
The issue with the open weave and thickness, I just chalk up to lack of experience with evaluating crochet pattern photos and knowing how various weights of yarn work up. Nothing but experience will help with that.
Esther went out of her way to provide very clear directions and there were many good things to be learned from the comments section, wherein she answered issues. Unfortunately, I didn’t know about the wealth of information there until I ran into a couple problems, or I might have read through them sooner and saved myself some headaches. However, I’m still at the phase where some of the discussions don’t make sense to me until I’m looking at the project taking form, so I’m not going to be too hard on myself.
There are four basic things I learned from crocheting my version of this sweater.
- How to make the nicely elastic foundation starting chain (NOT the normal starting chain)
- How to form an underarm when working in the circular from the top down
- How body position affects perception of fit
- How to problem solve directions
1. The Foundation Starting Chain – The foundation starting chain is a wonderful discovery! It makes so much sense when the beginning of the sweater is the neckline, or any part that will need to ease over larger body parts. It took a bit of searching to find the helpful video below about it. I saved it on my crochet crazy pinterest board, so that I will know where to find it for review.

2. Forming the Sleeves – I had made very short cap sleeves in a similar way with another sweater, but it hadn’t involved adding anything to the sleeve opening. This pattern was a good introduction to that technique of adding yarn at these points to crochet the sleeves in circular. I did have a bit of trouble keeping exact count with the pattern in doing it, but since I frequently have trouble with sleeves being too tight on my swimmer’s arms, it was easy and just as well to slightly increase the circumference of the sleeves. This took care of my counting issues and resulted in a very comfortable fitting sleeve. (click on any photo to enlarge)
3. Evaluating the Fit – I had a little more trouble evaluating the length of the sweater body and sleeves, as I was making final decisions about where to end them. Part of what mislead me was that I tried it on sitting down. No, I was not being lazy. I was trying to creatively deal with being on an airplane. I should have known better. You cannot get the proper hang on the garment when sitting. The fact that I had accidentally made the smaller size affected this, because being more closely fitted means it wants to ride up some. So, with the body of the sweater, the illusion while sitting down was that it was as long as I wanted, but standing up, it tended to shorten some. Still, it ended up within wearable parameters.
The sleeves are elegantly belled and middle-ages long. This is my main and purposeful deviation from the pattern. I knew I wanted long sleeves. With longer arms than average, I have enough store bought sweaters that end up as 3/4 sleeves that I am always trying to pull down. I may have overdone it a couple of inches.
I was trying them on regularly as I came closer to the end, but, again, not standing up. With standing, the weight of the sleeves pulls them down over my hands. Very queenly. And impractical. However, they fold up into a cuff and stay there. I could unravel and refinish them to a shorter length, but for now am going to regard them as instant mittens.

4. Problem Solving Pattern Instructions – The crochet directions were written slightly differently from others I had encountered, up until then. I have since seen this as a normal variation; and as I mentioned earlier, the author was great about answering questions. The main thing that was different, from my perspective, was that it was not specified exactly where to do the next stitch all the time. It was assumed that, if it was not otherwise stated, the next stitch was done in the very next empty stitch in the row being crocheted onto. This was reasonably figured out by just trying the pattern some, which helped make it more clear what was being described.
It helped a lot in pattern reading problem solving that I have overcome my aversion to undoing stitches. In my beginning days, I really resisted undoing work unless I absolutely had to. Nowadays, I will more readily undo things to evaluate and figure things out.
This sweater has an average ranking of 3-4 for difficulty on the Ravelry.com scale of 1-10, with 10 being most difficult. I think it could be a satisfactory first sweater attempt for someone who has done a lot of other, non-garment crochet. If a person has not crocheted very much in general, it would be much more daunting, which I think probably accounts for some of the 5-7 level ratings. The page on ravelry.com showing versions that have been made by people is a good place to get color ideas.
I have gotten many compliments on the sweater the few times I have worn it. It has a rich feel and look to it. It is one I would consider making again, but might also experiment with using finer yarn, thus needing to adjust the stitch count. If I get a little more experience under my belt, I see that as a manageable adventure.

